Nano Banana Pro, Google's groundbreaking AI image editor, has introduced a new paradigm for AI image generation and manipulation. As with any emerging technology, the question of which prompts yield the best results is paramount for this powerful image editing tool.
To help you master it, we have compiled a collection of highly effective AI image generation prompts. While presented in English, they can be adapted to your preferred language using translation tools.
Here's a quick summary of what makes this AI image editor stand out, based on official documentation and community feedback:
- Core Strengths: According to the Google Developers Blog, its key advantages are multi-turn refinement and remarkable subject consistency. Its capabilities in iterative editing and text layout are also solid.
- Key Features & Limitations: The tool excels at placing the same character in different scenes and merging two images. However, as noted by outlets like Axios and PC Gamer, some basic editing functions (like precise cropping) are still a work in progress.
- Community Wisdom: For realistic composites and background swaps, Reddit users emphasize that matching scene consistency and lighting is absolutely crucial for believable results.
AI Prompts for Storyboards & Character Consistency
Ideal for when you need to upload a photo of a person or character and generate a full storyboard.
- Turn the uploaded portrait into a collectible character figure. Place a branded box behind it (the box should show the character's image), with a computer screen to the side showing a Blender modeling viewport. The figure should be on a round plastic base. PVC look, indoor studio, realistic lighting, film tone, maintain the original facial identity.
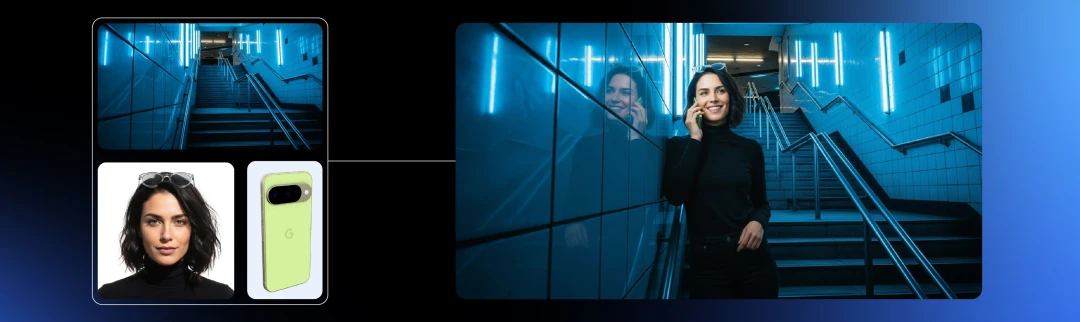
- Keep the same character. Scene 1: A subway platform with a cool blue ambiance and a rim light from behind; camera at chest height, medium shot.
- Same character, close-up in a coffee shop, with a shallow depth of field (bokeh) and warm, golden-hour light. The character's hands are holding a paper cup with subtle steam; preserve the subject's identity and hairstyle.
- Same character, in a nighttime office scene with reflections on the glass and bokeh from city lights in the background. Use three-point lighting for a medium-wide shot.
- Same character, in a warehouse with volumetric light rays streaming through the windows, visible dust motes, and a slightly desaturated cinematic look.
- Generate a 6-frame storyboard: hero introduction, establishing shot, close-up on hands, over-the-shoulder UI shot, product hero shot, and an end card. Maintain character identity and a consistent wardrobe across all frames.
- Change the pose to a forward walking motion, with a slight motion blur on the legs while preserving key facial details.
- Place the same character on a rainy street, with reflections on the wet asphalt and glowing neon signs; maintain their original eye color and freckles.
- Same character, studio packshot with a neutral gray background; use a soft top light and a fill card from camera-left, with a neutral expression.
- Generate an 8-frame shot list for an unboxing video: box on a table → hands opening the box → figure being removed → detail close-ups → turntable shot → final hero shot. Maintain consistent product scale and branding.
E-commerce Prompts for Product Compositing
These prompts are designed for product and scene integration in e-commerce imagery.
- Merge image 1 (the product) with image 2 (a modern kitchen). Place the product on a marble countertop, ensuring realistic reflections and shadows; set the color temperature to ~5000K and add a slight vignette.
- Place a cosmetics bottle on an acrylic pedestal against a seamless paper backdrop. Light it with a softbox from the right, use a subtle gradient background, and ensure specular highlights are controlled.
- Place sneakers on a concrete block for a low-angle hero shot. Use studio rim lighting and a faint haze to add depth.
- Create a floating exploded view of a smartphone, showing separated layers for the screen, mid-frame, and camera module. Set it in a dark studio with managed glossy reflections.
- A macro shot of a watch from a 90° top-down angle, using soft diffused light. The brushed metal texture should be visible, with anti-aliased text on the dial.
- Generate A/B variants: use the same layout but change only the background material (wood, stainless steel, or terrazzo), keeping the product's color constant.
- Create a lifestyle placement shot: place the product on a side-table next to a sofa in a living room, with daylight coming from a window camera-left. The white balance should be matched to the scene.
- Generate a promotional trio of images: front, 45°, and top-down angles in a single session, ensuring a consistent brand palette and shadows.
AI Prompts for Portrait Makeup & Wardrobe Swaps
Note: For best results, always emphasize maintaining identity consistency in your prompts.
- Maintain the subject's facial identity while changing the hairstyle to a retro bob. Add thin eyeliner, apply a soft skin retouch that preserves pore detail, and include realistic flyaway hair strands.
- Swap the outfit to streetwear (an oversized hoodie and cargo pants) against a neutral studio background, using soft Rembrandt pattern lighting.
- Add sunglasses with subtle reflections, making sure the eyes are still faintly visible through the tinted lenses.
- Create a formal portrait with the key light at 45°, fill light at -1EV, a seamless #EAEAEA background, and color-accurate skin tones.
- Generate an outdoor candid shot, using an overcast sky as a giant softbox. Add a slight film grain and be sure to maintain the subject's freckles and moles.
- Generate an ID-style headshot: straight-on camera angle, no smile, flat and even lighting, a neutral background, and maintain the exact facial geometry.
Mastering Lighting & Photographic Language with AI
- For a film noir look: use a hard key light from a high angle to create deep shadows, place a practical lamp in the background, and add smoke for atmospheric volume.
- Evoke a golden hour feel with backlighting, a rim light on the hair, lens flare streaks, and warm highlights around 5600K.
- Use a top-down softbox with negative fill on both sides to sculpt the face, creating a subtle catchlight in the eyes.
- A high-key beauty shot with a near-white background, low contrast, and controlled specular highlights.
- Create a scene with reflections in the rain on a wet street, glowing neon signs, and light trails from a long exposure.
- For a product hero shot: use flags to control highlights, a gradient card to enhance polished metal, and keep the reflection on the base tight and clean.
Prompts for Realistic Materials & Textures
Use these prompts to make AI-generated textures more believable.
- Render a PVC plastic look with slightly translucent edges, a smooth specular roll-off, and no micro-scratches.
- Simulate anodized aluminum with a fine linear brushed texture and soft anisotropic highlights.
- Create a matte ceramic surface with soft diffusion and a micro-pitted texture that is only visible in macro shots.
- Render brushed stainless steel with subtle, realistic fingerprints near a button.
- A frosted glass bottle showing internal light scatter and a bright meniscus line on the liquid inside.
AI Prompts for Generating Text & Posters
The official documentation highlights the model's targeted optimization for rendering text, making it a great tool for creating posters, logos, and covers.
- Poster: bold headline “AI VIDEO STUDIO”, sub-headline in small caps, clean sans-serif font, centered layout; hero product in the bottom-right, strong grid, and optical margin alignment.
- Create a minimalist event flyer with the date “09·10” in large numbers and the venue listed in a small line below. Ensure the text is crisp and perfectly aligned.
- Design an app mock-up poster featuring a phone frame with a UI on the screen, a 5-6 word headline, and a “NEW” badge.
- Place a brand logo lockup on a dark background with a subtle glow, ensuring high legibility and no distortion.
- Generate a YouTube-style thumbnail with a large close-up of a face, a punchy 3-5 word title, high contrast, and composed according to the rule of thirds.
Compositing & Scene Replacement Prompts
As highlighted by official sources and media outlets, multi-step editing and two-image merging are standout features. For the most realistic results, pay close attention to matching the light source, focal length, and color temperature between elements.
- Replace the background with a snowy mountain scene; match the key light from camera-right, and add faint footprints in the snow.
- Place the subject into a museum gallery, with realistic reflections on the polished floor and soft track lighting from the ceiling.
- Combine a portrait with a night city rooftop scene; add wind-blown hair, and use a cool key light with warm practical lights in the background.
- Merge a product into a bathroom with a marble vanity; use soft window light and ensure any mirror reflections are consistent.
- Place the subject into a library with warm tungsten practical lights, ensuring the lens fall-off is consistent with a 50mm lens.
- Remove clutter from a desk, keeping only the laptop and mug, and fill in the empty areas with plausible textures.
Controlling Lens Language & Composition in AI
Use these prompts for precise control over shot composition.
- Compose an eye-level medium shot using a 35mm equivalent focal length, adhering to the rule of thirds.
- An 85mm portrait with a shallow depth of field to create strong background separation.
- A top-down flat-lay composition with grid-aligned objects and neat, even spacing.
- A low-angle hero shot where leading lines converge on the subject.
- Create a tilt-shift miniature effect with a very thin plane of focus running through the subject.
Prompts for Special Effects, Mood & Atmosphere
- Add light fog and god rays streaming from a window, with dust particles visible only in the backlight.
- Apply a subtle, fine film grain, minimal chromatic aberration, and a letterboxed aspect ratio.
- Incorporate rain streaks and ripples on the surface of puddles, keeping reflections intact.
- Add floating fireflies or bokeh spheres that vary in size based on their depth in the scene.
- A confetti burst captured with a shallow depth of field, where motion blur is applied only to the confetti.
Using Multi-Turn Dialogue Scripts for Refinement
Multi-turn iteration isn't just a feature—it's the officially recommended best practice for getting the best results from the AI image editor.
Script A | Character Scene Storyboard (3 Steps)
- Turn 1: Upload the portrait. Place the same person on a sunlit café terrace; use warm golden hour light, a shallow DOF, and a cinematic tone.
- Turn 2: Maintaining the subject's identity, add a laptop with a code editor on the screen and a cup with visible steam. Adjust the white balance to be slightly cooler.
- Turn 3: Tighten the composition to a medium shot, brighten the catchlights in the eyes, and add a gentle film grain.
Script B | Product Three-View (3 Steps)
- Turn 1: Generate a front-on hero shot on a neutral backdrop with a soft top light and clean shadows.
- Turn 2: Now, add a 45° view, matching the exposure and shadow direction from the first shot.
- Turn 3: Finally, add a top-down view and assemble all three into a 3-panel layout with consistent margins.
Script C | Turning a Character into a Figure (3 Steps)
- Turn 1: Transform the subject into a PVC figure on a round base, set in an indoor studio with a film tone.
- Turn 2: Add a branded box behind the figure and a computer monitor to the side showing a Blender modeling viewport.
- Turn 3: Refine the edges on the figure's hair and fingers, and ensure all specular highlights are smooth.
Field Template for N8N Automation
{
  "prompt": "Turn the uploaded portrait into a collectible character figure on a round plastic base; branded box behind; monitor shows Blender viewport; PVC look; indoor studio; realistic lighting; film tone; keep identity.",
  "style_notes": "cinematic, shallow DOF, subtle film grain",
  "consistency_notes": "keep face geometry, eye color, hairstyle",
  "scene_alt": [
    "sunlit café terrace",
    "office at night",
    "rainy neon street"
  ],
  "product_merge": {
    "bg": "modern kitchen marble countertop",
    "shadows": "match key from camera right",
    "reflections": "controlled, realistic"
  }
}
Best Practices for Google's AI Image Editor
- Tell a story, don't just stack keywords. As Google's official guidance suggests, describe the scene in a full paragraph. Start with the overall composition, then layer in details about lighting and materials.
- Embrace iterative refinement. Use multi-turn dialogue to make micro-adjustments—like changing the light source direction, depth of field, or highlight control—modifying only one or two factors at a time for precise control.
- To maintain character consistency, start with a clear reference image. Use consistent descriptive terms for features like hairstyle, skin tone, and facial details in your prompts to avoid drastic changes. Matching the character to the scene's lighting will also improve realism.
- Understand its limitations. Some basic edits, like precise cropping to a specific aspect ratio, can still be unrefined. A good workaround is to specify the desired composition and include extra whitespace during generation, which you can crop later.
Further Reading & Official Links
- Official Guide: Intro to Gemini 1.5 Flash for Images & Prompting. This Google Developers Blog post includes official examples for multi-turn iteration, working with text, and more.
- API Documentation: Gemini API Image Generation and Editing. The official docs from Google AI for Developers provide structured advice, emphasizing the importance of "describing scenes, not just keywords."
- Product Portal: AI Studio. Access the preview, which includes official templates and examples for maintaining consistency.
- Media Coverage: Read reports from Axios and PC Gamer for insights into the tool's feature boundaries and overall user experience.
- Community Insights: Explore Reddit threads for community-developed techniques and real-world tests, especially for achieving realistic scene replacements.